DIY Your Own Garden Bench Out Of Cement For Furniture That Lasts

We may receive a commission on purchases made from links.
Does your backyard garden space feel like something's missing? If you enjoy spending time in the garden, adding furniture to the area is a great way to not only introduce seating in some instances, but it can visually enhance the look of your yard as well. One way to avoid paying high prices for outdoor garden furniture is to DIY a budget-friendly concrete bench. Crafting this bench involves using adhesive to attach different shapes of concrete stones together to create charming seating.
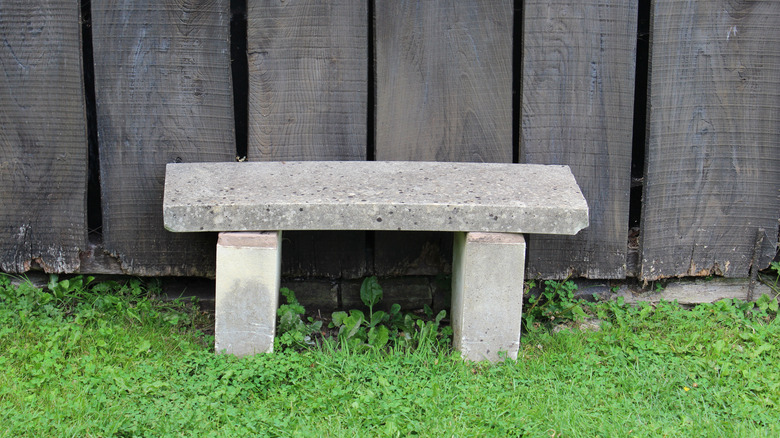
There are several ways to make a DIY garden bench, but this approach eliminates the need to pour your own concrete and wait for it to cure. Instead, you can choose concrete patio stones in a color or finish to complement your overall design scheme. Some examples of some pre-made stones you can keep an eye out for on your next thrifting adventure include a large cement stepping stone or wall panel to use as the seat of the bench, and creatively shaped pavers or patio blocks for the legs.
How to make a budget-friendly garden bench from concrete
Creating a DIY backyard patio oasis doesn't have to be difficult with this budget-friendly hack using pre-formed concrete stones. If you thrifted your stones or they've just been sitting collecting dust from a past project, start by cleaning the surface with a soft brush to remove any debris or buildup. Use a mixture of dish soap and warm water, roughly one teaspoon of soap per gallon, for the cleaning solution. A power washer may be needed for concrete with heavy staining, but use caution to avoid damaging the stones. Be sure to rinse surfaces thoroughly and let dry before moving on to the assembly.
Start by turning the concrete step that will be the seat portion of the garden bench upside down so the designated underside is facing upwards. Measure and mark where you'd like the legs of the bench to sit. Apply a generous layer of landscape adhesive, similar to the Liquid Nails Landscape Block Adhesive, to the stone and firmly press the legs into place. The paver stones will be set vertically, perpendicular to the bench seat. You can set the bench at different heights by adhering multiple paver stones together. Allow the adhesive to dry for at least 24 hours before putting the bench to use, but note that these types of products can sometimes take up to 7 days to fully cure. As a design alternative, consider using cedar planking for the bench seat, and the patio blocks for the legs.
Common DIY pitfalls to avoid when constructing a garden bench
While this project is a great repurposing DIY to complete over a weekend, it's important to avoid some of the common pitfalls when constructing a budget-friendly bench. One thing to keep in mind is the limitations of the new bench. For example, the weight and load-bearing capabilities will vary depending on the type of adhesive you use or the structural integrity of the stone. This means some garden benches may be better suited for holding flower pots and garden decorations rather than serving as functional seating for guests. Be sure to use high-quality landscape adhesive and to measure when placing the stone legs to promote even weight distribution.
Another pitfall is not taking steps to make concrete stones weatherproof before constructing the garden bench. While concrete is incredibly durable, it's porous, meaning water can get into the tiny holes in the material's surface. Setting aside time during the DIY to add a sealant to the stones can help improve the bench's longevity and appearance, as some varieties come with a colored tint to the sealer.